Home | Marine Mammals | Nose Dive
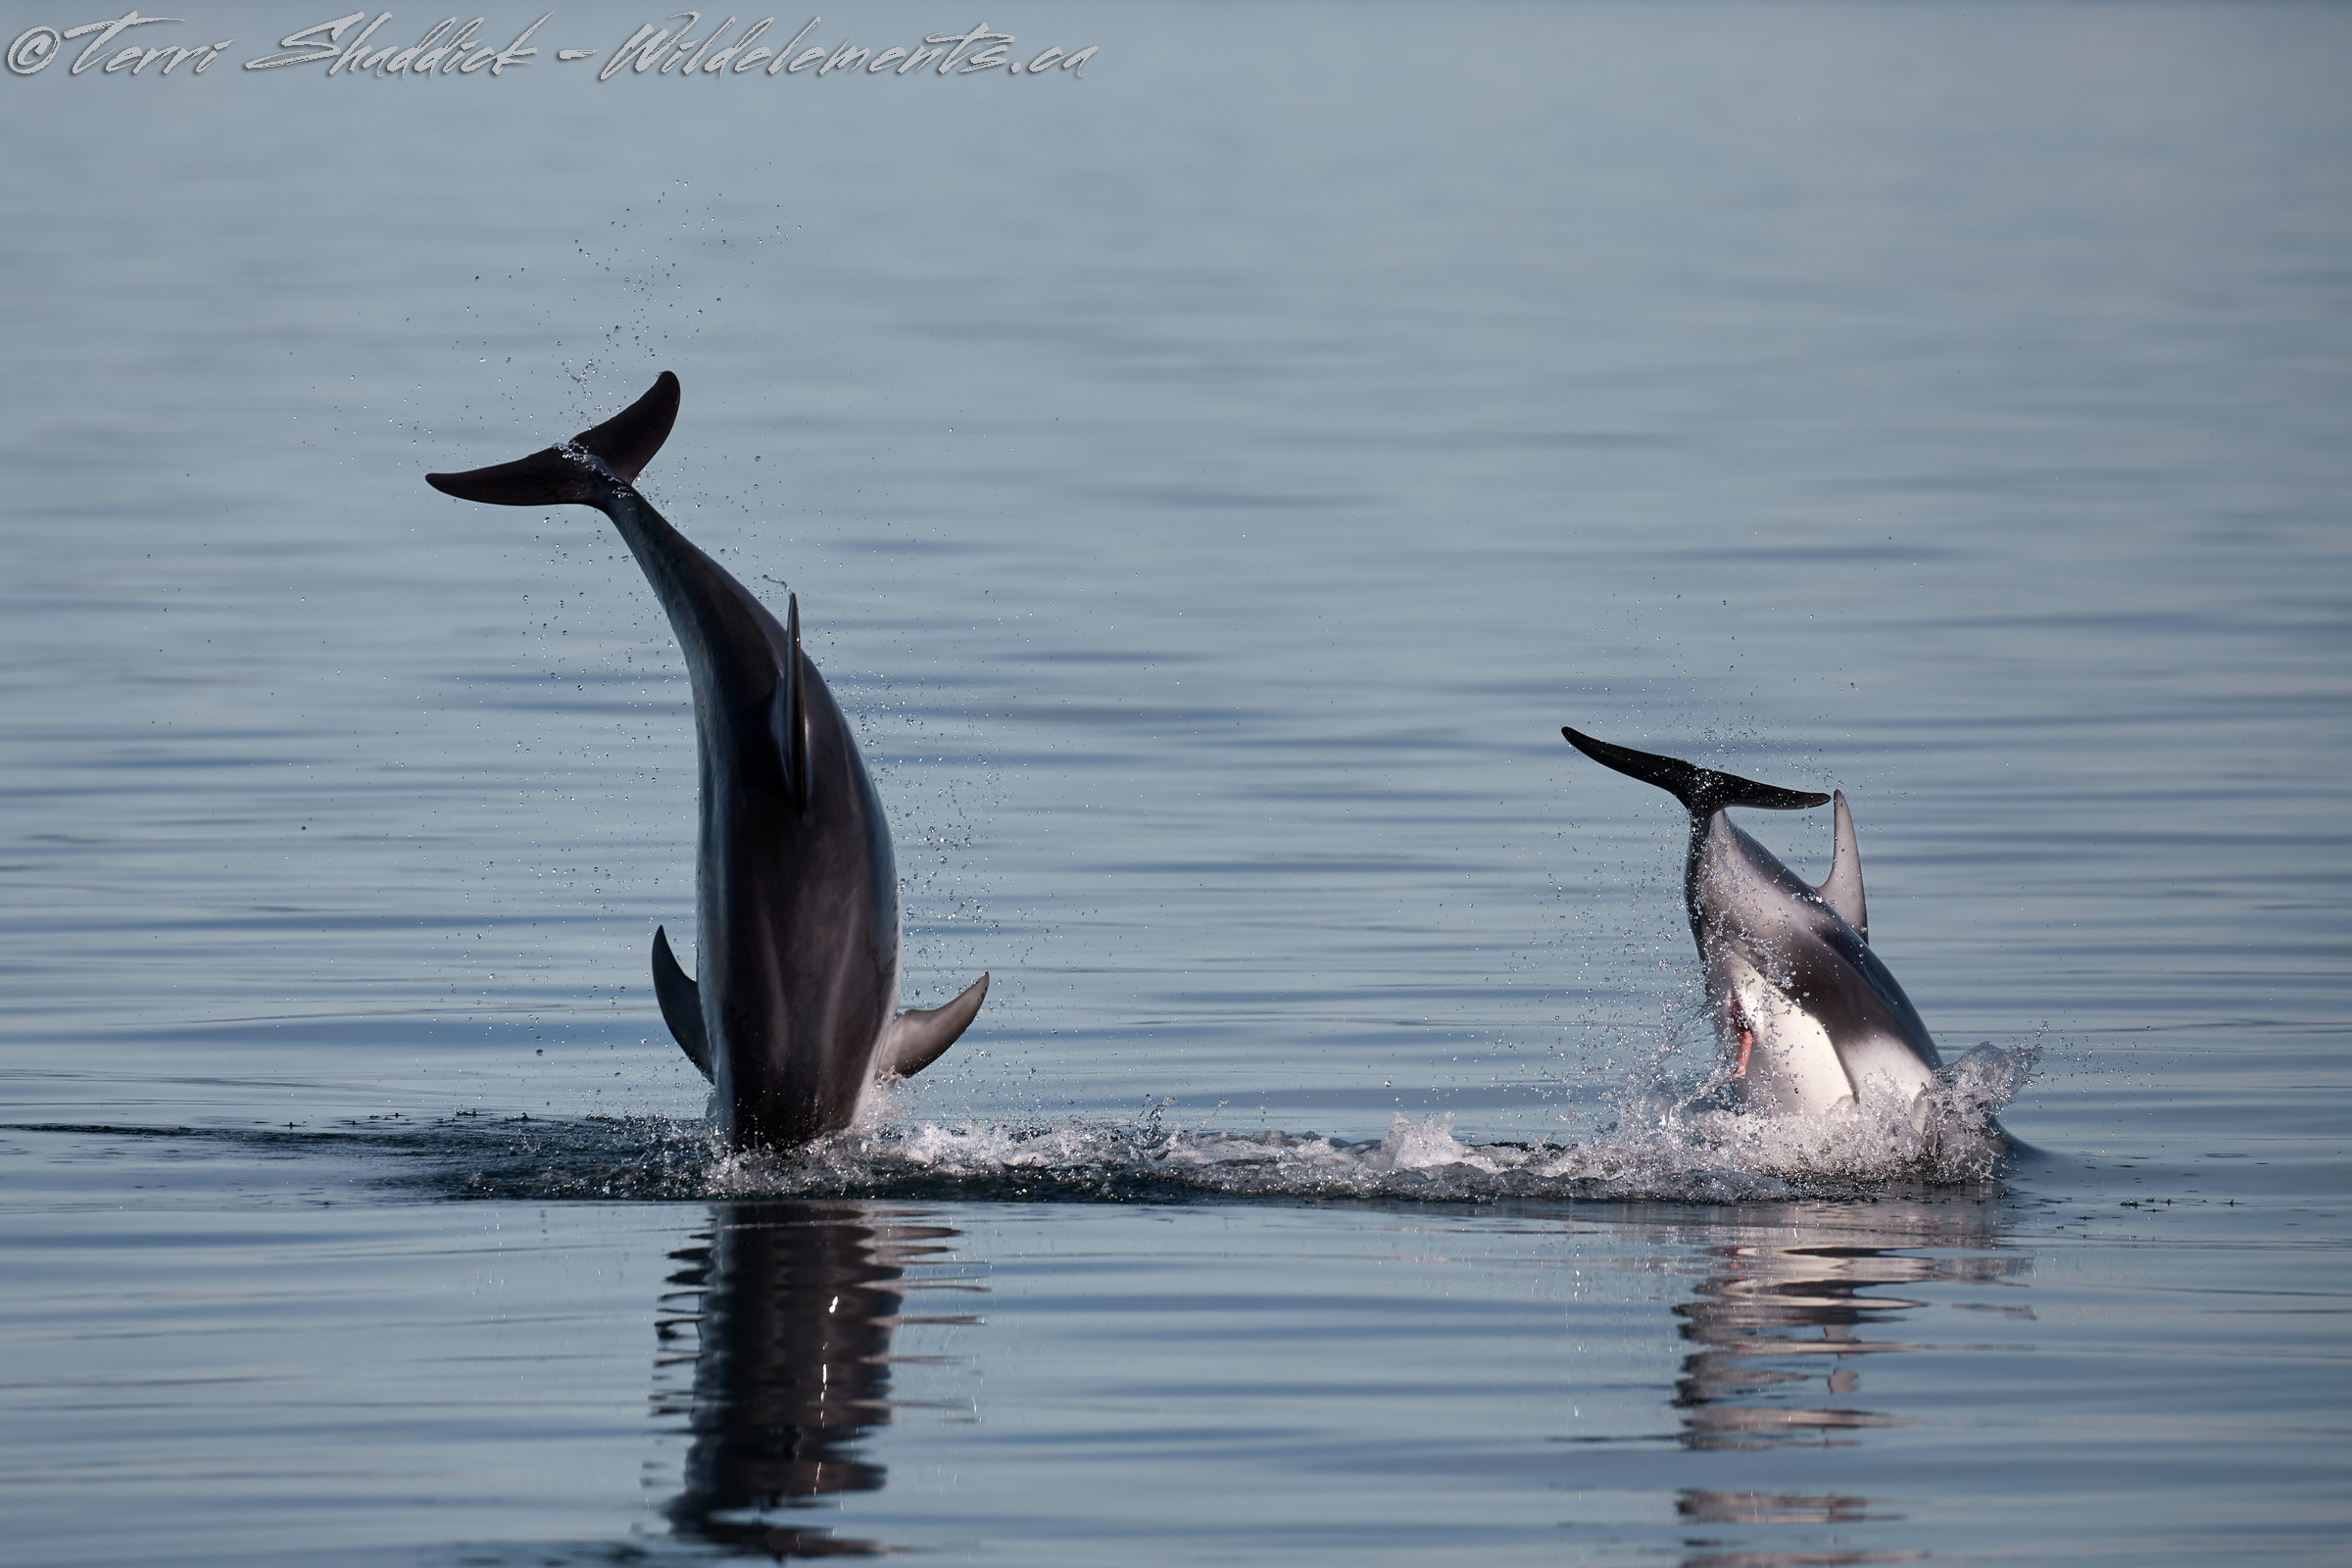
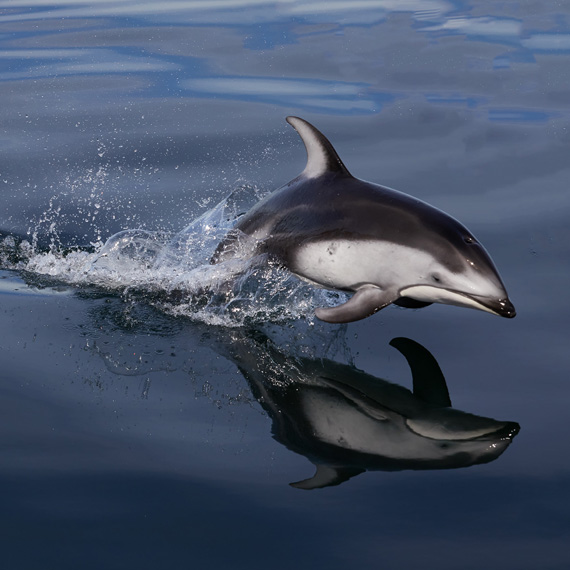
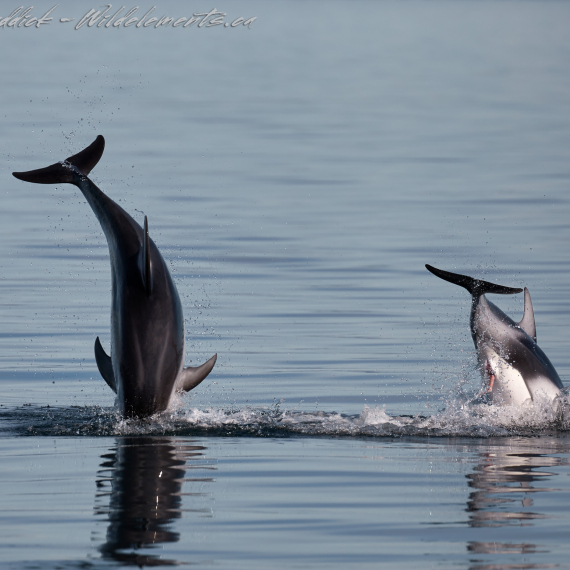
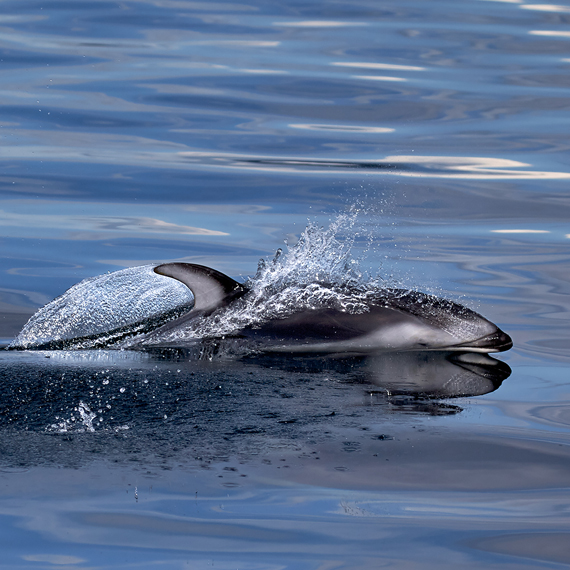
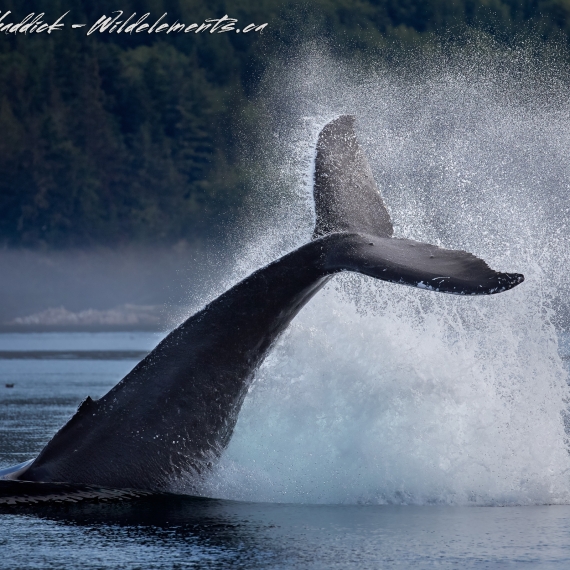
One of the most fun and most dynamic (and quite tricky) marine mammals to photograph on our Marine Mammals photo tour is the Pacific White-Sided Dolphins. They usually show up in large pods, and you never one where they are going to pop-up and which ones are going to be “jumpers”.
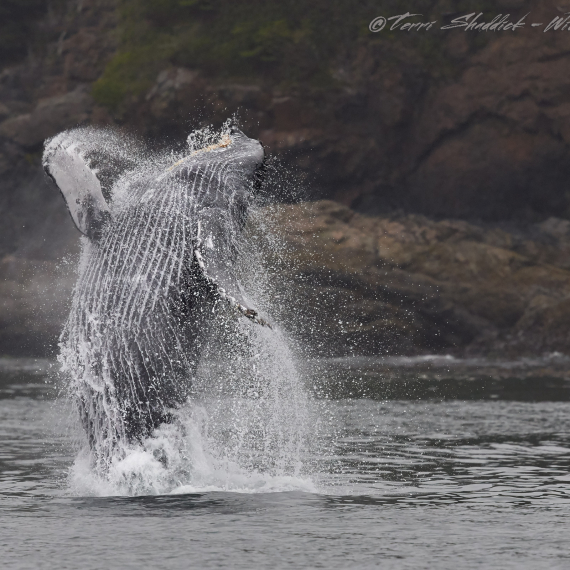
Unfortunately I missed the first part of the jump, but got the tail end of it (pun intended), as both these dolphins were taking a nose dive into the water. I like that they were both headed down in different directions so that you can see both the backside and underside of the dolphin, which is usually hidden from view because it’s in the water.
This image is copyright © Terri Shaddick, if you are interested in using or purchasing this image, or any other images on my site, contact Terri Shaddick at contact@wildelements.ca.
Taken: August 4, 2018
Location: Johnstone Strait, British Columbia
Camera: Canon EOS 5D Mark IV
Lens: Canon EF 100-400mm f/4.5-5.6L IS II USM
Focal Length: 400mm
Aperture: f/7.1
ISO: 200
Exposure: 1/2000
As I mentioned in the about this image, photographing Pacific White-Sided Dolphins is incredibly dynamic, and therefore you need to be pretty fast on the shutter, and constantly be scanning for the action. Because when they come out of the water they can create a splash, and we had varying light from really dark water to quite bright water, I used -2/3 exposure compensation in the field.
Editing this image I did two variants in Capture One Pro (three “layers”). In all images I de-saturated the blues because the image was way too blue. Additionally I did exposure adjustments between the three layers with the background/foreground of +.27, and the subjects I had to variants of 0.31 and 0.45. On both the subject variants I also adjusted the levels bringing up the black slightly +2, and whites to 216 (from 255).
In photoshop I blended the three layers, using a combination of the second and third one on the dolphins.
Additionally, I used Content Aware Fill to remove a small blown-out sun spot on the back of the dolphin on the left. I found this worked better than the clone or healing tool as it gave a nice mix of dark and lighter grey on the dolphin, where I wasn’t able to get that mix with the other tools.
Finally I used Lightzone tone mapper with a 450 radius selectively on the dolphins to just bring out the contrast just a little more. And then I prepared my images for web output by sharpening, and cropping.
About this Image
One of the most fun and most dynamic (and quite tricky) marine mammals to photograph on our Marine Mammals photo tour is the Pacific White-Sided Dolphins. They usually show up in large pods, and you never one where they are going to pop-up and which ones are going to be “jumpers”.
Unfortunately I missed the first part of the jump, but got the tail end of it (pun intended), as both these dolphins were taking a nose dive into the water. I like that they were both headed down in different directions so that you can see both the backside and underside of the dolphin, which is usually hidden from view because it’s in the water.
This image is copyright © Terri Shaddick, if you are interested in using or purchasing this image, or any other images on my site, contact Terri Shaddick at contact@wildelements.ca.
Taken: August 4, 2018
Location: Johnstone Strait, British Columbia
Camera Specs
Camera: Canon EOS 5D Mark IV
Lens: Canon EF 100-400mm f/4.5-5.6L IS II USM
Focal Length: 400mm
Aperture: f/7.1
ISO: 200
Exposure: 1/2000
Capturing & Processing
As I mentioned in the about this image, photographing Pacific White-Sided Dolphins is incredibly dynamic, and therefore you need to be pretty fast on the shutter, and constantly be scanning for the action. Because when they come out of the water they can create a splash, and we had varying light from really dark water to quite bright water, I used -2/3 exposure compensation in the field.
Editing this image I did two variants in Capture One Pro (three “layers”). In all images I de-saturated the blues because the image was way too blue. Additionally I did exposure adjustments between the three layers with the background/foreground of +.27, and the subjects I had to variants of 0.31 and 0.45. On both the subject variants I also adjusted the levels bringing up the black slightly +2, and whites to 216 (from 255).
In photoshop I blended the three layers, using a combination of the second and third one on the dolphins.
Additionally, I used Content Aware Fill to remove a small blown-out sun spot on the back of the dolphin on the left. I found this worked better than the clone or healing tool as it gave a nice mix of dark and lighter grey on the dolphin, where I wasn’t able to get that mix with the other tools.
Finally I used Lightzone tone mapper with a 450 radius selectively on the dolphins to just bring out the contrast just a little more. And then I prepared my images for web output by sharpening, and cropping.


Share on:


