In Part 1 of this blog series I listed the different types of AF Points, and how I have grouped them to make it easier on myself. In Part 2 I discussed the two “single points” AF Points, being Single-point Spot AF (pinpoint or spot as I call it) and Single-point AF (single-point as I call it). For this post I’m going to go into the “Expansion Points” AF Area Modes, which includes the “AF Point Expansion” and “AF Point Expansion Surrounding Points” (don’t those names just flow of the tongue, haha).
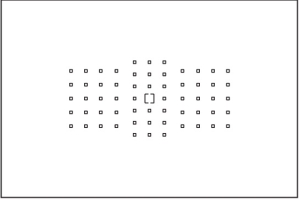
AF Point Expansion ( I call this the diamond or expanded point)


This is a diamond shaped AF Area Mode that moves together as one point. It includes one point in center, and also the points on the top, bottom, right, and left. The focus will be prioritized to the centre point, with the surrounding points providing focus assistance. These points will move over the entire array as a group. Just one thing to note that focus being prioritized to the center point is different from some of the other AF Area Modes (and different from similar Nikon AF Area Modes), which will put priority on the closest object, instead of the object that is in the center point.

Focused


The diamond provides a larger area for focusing with and would be used in the following scenarios

-When hand holding, it provides a larger focus point, and therefore will be less likely to slip-off the subject.

-If you have a subject that is moving around a bit, but not too sporadically, it can be easier to keep focus on the subject, and you have the ability to adjust the sensitivity of these points to ensure you stay on the subject.

-This point provides both AF Tracking (adjustments available) and predictive AF.


The downside to the diamond compared to the single point options is that because it is larger, it is less precise, and therefore focus may not always be exactly where you want it. For example if you have a very tiny subject in an animalscape the autofocus might be on the incorrect spot.


I tend to use this AF Area Mode as a starting point for some of my custom settings. Not only is it in the middle of the points that I would use (so easy to adjust up or down), but I find it provides enough precision, but is not too precise that it is a good default point. This is a safe starting point because it typically doesn’t go awry, and then I can adjust the AF Area mode depending on how the situation plays out.


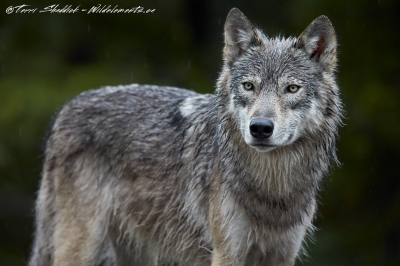
I used the diamond AF Area mode when shooting this wolf because the wolf was moving around quite a bit, and therefore I wanted to make sure that I didn’t suddenly focus on the tip of his nose, or the back of his head/body. The reason I didn’t use a bigger point such as the square, or one of the automatic points, is that I still wanted to have enough control to make sure the correct parts of the head were in focus.


For this AF Area Mode, you can also adjust the focusing parameters using the cases, or manually adjusting the parameters, which will be discussed in a future blog post.


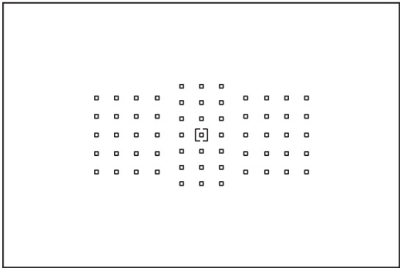
AF point expansion Surrounding Points (I refer to this as the square)
This point is very similar to the AF point expansion (diamond) described above, with the only difference is that it’s a complete square instead of a diamond.


This is a square shaped AF Area Mode, moves together as one point. It includes one point in center, and all the points surrounding it for 9 points in total. This point will prioritize focus to the center point, and then receive assistance from the surrounding points.

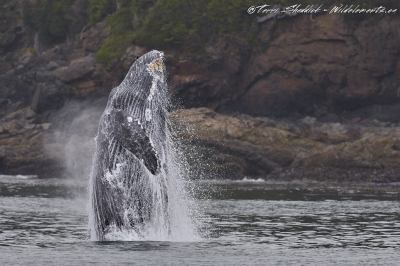
Breathtaking Breach


The square provides a larger area for you to focus than the single points, or the diamond, and I tend to use it in situations similar to described above for the diamond.

-When hand holding, it provides a larger focus point, and therefore will be less likely to slip-off the subject.

-If you have a subject that is moving around a bit, but nor sporadically, it can be easier to keep focus on the subject, and you have the ability to adjust the sensitivity of these points to ensure you stay on the subject.

-A bird in flight, especially one with a bit of an unpredictable flight pattern.

-This point provides both AF Tracking (adjustments available) and predictive AF.


One down side to this AF Area Mode is that it is a bit on the bigger side, for my liking, so I find it can be a bit hard to have precise control over.


I will tend to use the square over the diamond when there is a bit more unpredictability in the subject (moving around a lot, or birds in flight) because it has more supporting points that will take over the autofocus if I slip off the center AF point.


The image of the Humpback Whale breaching, I actually decided to use the square, because there was a lot of unpredictability on where the Humpback Whale was going to come out of the water, and how it would move once it did come out of the water. Therefore I wanted to give myself some more support with the surrounding points. If I had used the diamond I might have lost the focus a lot easier, or not acquired initial autofocus as quickly. I will discuss in the next set of blog posts why I didn’t use one of the zones.


For this AF Area Mode, you can also adjust the focusing parameters using the cases, or manually adjusting the parameters, which will be discussed in a future blog post.


Feel free to email me, [email protected], if you have further questions on the expanded points AF Area modes, or with any other questions. Stay tuned to the next post where I will cover the zones, and automatic area modes, and when they can work for wildlife (and why I don’t often use them).

In Part 1 of this blog series I listed the different types of AF Points, and how I have grouped them to make it easier on myself. In this blog post I’m going to discuss the two “single point” AF Points, being Single-point Spot AF (pinpoint or spot as I call it) and Single-point AF (single-point).


Single-point Spot AF (I call this “spot” or “pinpoint”)


This is the smallest focusing point available. You would use this point when you want focusing to be very precise, as focusing will be done on the very small little square within the bigger square. I find myself using this point in the following situations:


–  When a animal is super close, and I want to ensure I have the exact right focus point (like between the eye and nose of Grizzly Bear); or
–  When the subject is quite small in the frame and I want to make sure that the focus stays on one small point; or
–  If you are shooting a bird in a tree and in between branches, and you want to make sure not to pick up some of these other branches; or
–  When using a large aperture and trying to get a shallow DOF, you want to make sure the exact point where you want sharpness is selected, especially if the entire subject isn’t on the same focal plain.


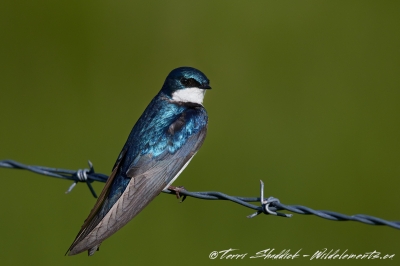
Tree Swallow on barbed wire

Balancing on Barbed Wire

One of the main downsides to using spot is that if you are hand-holding, like I often do, it can be quite easy to slip off the point, because the point is so fine and precise. It is often not the best AF point on a subject that is moving, especially moving fast, because you increase the changes of slipping off the subject and blowing the focus of the entire image. Therefore using this point is more effective when using a tripod on a subject that isn’t moving (or not moving quickly).


I used the spot AF to focus on the Tree Swallow in Balancing on Barbed Wire. I actually started with zone AF when shooting this guy, but then when he landed on the barbed wire and looked like it was going to stay still, I switched to the spot. The reason I did this is because the bird is so small I wanted focus to be on the head/eye and not on its shoulder/wing, especially because I was shooting this wide-open at f/5.6 (Canon 500 f/4 + 1.4x extender). Since the eye is drawn to the sharp part of an image, I wanted to make sure that was the eye of the bird. This image was a combination of using a small point because of the size of the subject, and therefore needed precision, and using a large aperture. In this particular image, if I had even switched and using Single-Point, it could have made a difference and picked up the shoulder of the Tree Swallow.


Single-point AF (referred to as “single-point” throughout the rest of this post):


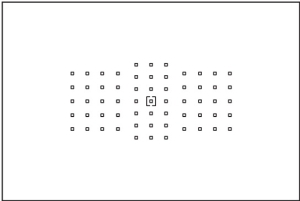
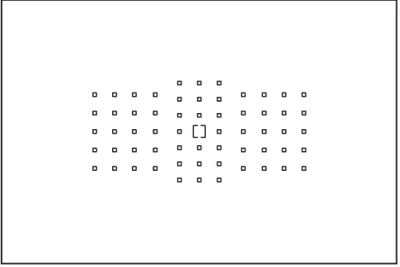
This AF point is slightly larger than the pinpoint above (Single-Point Spot AF as it is called in the Canon manual), and focusing is done on the entire square as shown in the image above. Because this point is similar to the pinpoint, just larger, I would use this in similar scenarios to the pinpoint:

– When a animal is super close, and I want to ensure I have the exact right focus point (like between the eye and nose of Grizzly Bear); or
– When the subject is quite small in the frame and I want to make sure that the focus stays on one small point; or
– If you are shooting a bird in a tree and in between branches, and you want to make sure not to pick up some of these other branches; or
– When using a large aperture and trying to get a shallow DOF, you want to make sure the exact point where you want sharpness is selected, especially if the entire subject isn’t on the same focal plain.


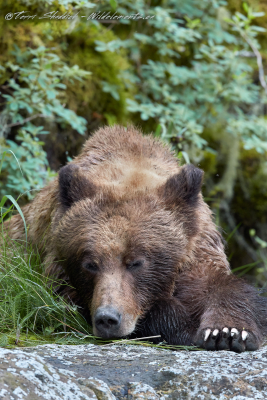
Sleepy Head

Similar to pinpoint, a downside to using single-point is when you are hand-holding the camera, you have a higher risk of losing focus if you slip off the subject. Therefore, again, it is often a point that would be more effective when used with a tripod, and on a subject with either little, or predictable, movement.


For the image of the Grizzly Bear that I titled “Sleepy Head” I used the single-point AF point, because given how zoomed in the shot was it was critical that I got the focus point right so that you can see the dimples in the nose and still have the eye in focus, so therefore I used this point and had it about half-way up the snout of the Grizzly Bear.


With the two points being quite similar just varying slightly in size, the question is what one to choose and when. Well that’s simple, “it depends”. I find that I will often go with the pinpoint when the subject is really small, or when there are a number of things that grab focus (like grass in front of a bear). I will go with the single point when the subject is slightly larger, or if the point being slightly larger won’t really matter.


Feel free to email me, [email protected] if you have further questions on the single point options.  Stay tuned to the next post where I will cover the expansion points.

In Part 1 of this blog series I listed the different types of AF Points, and how I have grouped them to make it easier on myself. In this blog post I’m going to discuss the two “single point” AF Points, being Single-point Spot AF (pinpoint or spot as I call it) and Single-point AF (single-point).


Single-point Spot AF (I call this “spot” or “pinpoint”)

This is the smallest focusing point available. You would use this point when you want focusing to be very precise, as focusing will be done on the very small little square within the bigger square. I find myself using this point in the following situations:


–  When a animal is super close, and I want to ensure I have the exact right focus point (like between the eye and nose of Grizzly Bear); or
–  When the subject is quite small in the frame and I want to make sure that the focus stays on one small point; or
–  If you are shooting a bird in a tree and in between branches, and you want to make sure not to pick up some of these other branches; or
–  When using a large aperture and trying to get a shallow DOF, you want to make sure the exact point where you want sharpness is selected, especially if the entire subject isn’t on the same focal plain.


Tree Swallow on barbed wire

Balancing on Barbed Wire

One of the main downsides to using spot is that if you are hand-holding, like I often do, it can be quite easy to slip off the point, because the point is so fine and precise. It is often not the best AF point on a subject that is moving, especially moving fast, because you increase the changes of slipping off the subject and blowing the focus of the entire image. Therefore using this point is more effective when using a tripod on a subject that isn’t moving (or not moving quickly).


I used the spot AF to focus on the Tree Swallow in Balancing on Barbed Wire. I actually started with zone AF when shooting this guy, but then when he landed on the barbed wire and looked like it was going to stay still, I switched to the spot. The reason I did this is because the bird is so small I wanted focus to be on the head/eye and not on its shoulder/wing, especially because I was shooting this wide-open at f/5.6 (Canon 500 f/4 + 1.4x extender). Since the eye is drawn to the sharp part of an image, I wanted to make sure that was the eye of the bird. This image was a combination of using a small point because of the size of the subject, and therefore needed precision, and using a large aperture. In this particular image, if I had even switched and using Single-Point, it could have made a difference and picked up the shoulder of the Tree Swallow.


Single-point AF (referred to as “single-point” throughout the rest of this post):


This AF point is slightly larger than the pinpoint above (Single-Point Spot AF as it is called in the Canon manual), and focusing is done on the entire square as shown in the image above. Because this point is similar to the pinpoint, just larger, I would use this in similar scenarios to the pinpoint:

– When a animal is super close, and I want to ensure I have the exact right focus point (like between the eye and nose of Grizzly Bear); or
– When the subject is quite small in the frame and I want to make sure that the focus stays on one small point; or
– If you are shooting a bird in a tree and in between branches, and you want to make sure not to pick up some of these other branches; or
– When using a large aperture and trying to get a shallow DOF, you want to make sure the exact point where you want sharpness is selected, especially if the entire subject isn’t on the same focal plain.


Sleepy Head

Similar to pinpoint, a downside to using single-point is when you are hand-holding the camera, you have a higher risk of losing focus if you slip off the subject. Therefore, again, it is often a point that would be more effective when used with a tripod, and on a subject with either little, or predictable, movement.


For the image of the Grizzly Bear that I titled “Sleepy Head” I used the single-point AF point, because given how zoomed in the shot was it was critical that I got the focus point right so that you can see the dimples in the nose and still have the eye in focus, so therefore I used this point and had it about half-way up the snout of the Grizzly Bear.


With the two points being quite similar just varying slightly in size, the question is what one to choose and when. Well that’s simple, “it depends”. I find that I will often go with the pinpoint when the subject is really small, or when there are a number of things that grab focus (like grass in front of a bear). I will go with the single point when the subject is slightly larger, or if the point being slightly larger won’t really matter.


Feel free to email me, [email protected] if you have further questions on the single point options.  Stay tuned to the next post where I will cover the expansion points.

Canon cameras, and all DSLR’s for that matter, have a number of features that are available to help you get the most out of your photographs. And one of those features is the latest Auto Focus settings that come with some of the newest amateur and professional bodies, including the 1DX mark II.


I have stumbled upon Canon’s recently released guide for the Canon EOS 1D X Mark II, which can be found here. Based on my experience the guide can equally be applied to the Canon EOS 5D Mark IV. This guide is probably one of the most extensive guides that I have seen Canon put out on this subject, which speaks the the importance of understanding the autofocus system, however again, it only speaks to one subject, sports, and it can often be difficult to understand how it applies to what we care about, nature.


However, one of the problems I had with guides like this is really understanding the “Cases”, and when certain AF points makes sense for my situation, since all the examples are sports related, and not wildlife related. I have created this series of blog posts, to breakdown the AF system of the Canon cameras, and how it applies to us nature/wildlife photographers, and what I have learned after my time using these settings. I have also decided to provide some guidance on when I use these settings, however, it always “depends” on when I use what, as every situation is unique.

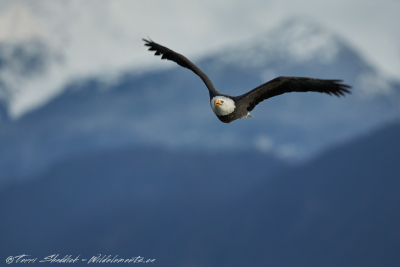
Birds in flight are one of the main subjects when having the correct AF settings can be the difference between making and missing the shot.  For the “Mountainside Voyage” I took advantage of Canon’s Zone AF using the 1DX in order to make sure that if the Bald Eagle takes a detour, I can still keep it in focus and keep getting the sharp shots.

Mountainside Voyage


AF Operation:

When thinking about autofocus, one of the first things to determine is which AF Operation is going to be used, with the options being One-Shot, or AI Servo. For wildlife shooting I have learned that it is unpredictable, and you want to always have yourself setup so you can respond when the unpredictable happens (and you don’t miss the shot). Therefore you want to be in AI Servo, as it will continuously focus on your subject when you press the shutter down halfway, and will have predictive focus capabilities and track the subject when it moves toward you.


For further clarification, predictive AF is NOT the same as subject tracking. When the focus is locked on a subject, Predictive AF will work in AI Servo to focus on the subject as it moves toward or away from you, assuming the subject stays in the AF point (a Grizzly Bear walking directly towards you). Whereas subject tracking is how the autofocus system respond when a subject moves away from the focus point (Grizzly Bear walking away from the AF point to an adjacent point).


You can change the AF operation using the Drive AF button and scrolling with the main dial.


AF Points:

Now assuming you are in AI Servo, the next question is, “Which AF point or AF Area do I use?”. Well the answer to that is simple, it “depends”.


I like to group the AF points into the following four categories:

1. Single Points – (AF Points – Part 2 Blog Post to come)

-Single-point Spot AF

-Single-point AF

  2. Expansion Points – (AF Points – Part 3 Blog Post to come)

-AF point expansion

-AF point expansion with surrounding points

  3. Zones – (AF Points – Part 4 Blog Post to come)

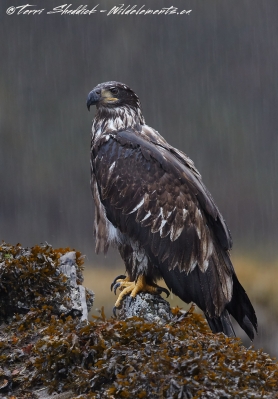
Bald Eagle Perched in Downpour Hurricane

Perched in a Downpour

-Zone AF

-Large zone AF

  4. Automatic selection (AF Points – Part 4 Blog Post to come)


Given the length and complexity of each autofocus point, I have decided to split this topic into several different blog posts, so that I can provide example images, and details on when I would use each point.


Also, following the posts on the AF points, I will also dive into the topic of the “Cases” and explain what they really mean, besides “good for a cycling race” so that you can set yours up for the situation you are presented with.


Knowing how and when to use the above points, and also modifying your cases, can be the difference between getting and missing the shot, especially if you modify these settings and setup your cases to reflect different shooting scenarios.


This image “Perched in a Downpour” was shot with “Single-Point AF”, and the reason that this was required was because we were shooting in an absolute downpour. Any of the bigger AF points would be picking up the rain drops, because they were huge, plentiful and closer to us then the Bald Eagle was. The reason I didn’t go with the smaller, Single-point Spot AF was because we were shooting from a Zodiac and there was some movement with the motor and the movement from the water, so I wanted to have a slightly larger point to help stay “locked-on” the Bald Eagle.