16 Apr Canon’s AF System – Part 2


In Part 1 of this blog series I listed the different types of AF Points, and how I have grouped them to make it easier on myself. In this blog post I’m going to discuss the two “single point” AF Points, being Single-point Spot AF (pinpoint or spot as I call it) and Single-point AF (single-point).
Single-point Spot AF (I call this “spot” or “pinpoint”)
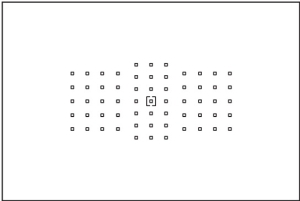
This is the smallest focusing point available. You would use this point when you want focusing to be very precise, as focusing will be done on the very small little square within the bigger square. I find myself using this point in the following situations:
– When a animal is super close, and I want to ensure I have the exact right focus point (like between the eye and nose of Grizzly Bear); or
– When the subject is quite small in the frame and I want to make sure that the focus stays on one small point; or
– If you are shooting a bird in a tree and in between branches, and you want to make sure not to pick up some of these other branches; or
– When using a large aperture and trying to get a shallow DOF, you want to make sure the exact point where you want sharpness is selected, especially if the entire subject isn’t on the same focal plain.
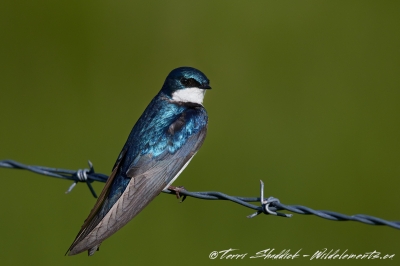
Balancing on Barbed Wire
One of the main downsides to using spot is that if you are hand-holding, like I often do, it can be quite easy to slip off the point, because the point is so fine and precise. It is often not the best AF point on a subject that is moving, especially moving fast, because you increase the changes of slipping off the subject and blowing the focus of the entire image. Therefore using this point is more effective when using a tripod on a subject that isn’t moving (or not moving quickly).
I used the spot AF to focus on the Tree Swallow in Balancing on Barbed Wire. I actually started with zone AF when shooting this guy, but then when he landed on the barbed wire and looked like it was going to stay still, I switched to the spot. The reason I did this is because the bird is so small I wanted focus to be on the head/eye and not on its shoulder/wing, especially because I was shooting this wide-open at f/5.6 (Canon 500 f/4 + 1.4x extender). Since the eye is drawn to the sharp part of an image, I wanted to make sure that was the eye of the bird. This image was a combination of using a small point because of the size of the subject, and therefore needed precision, and using a large aperture. In this particular image, if I had even switched and using Single-Point, it could have made a difference and picked up the shoulder of the Tree Swallow.
Single-point AF (referred to as “single-point” throughout the rest of this post):
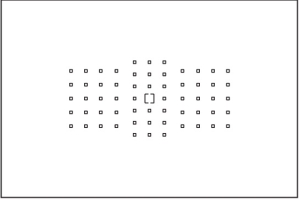
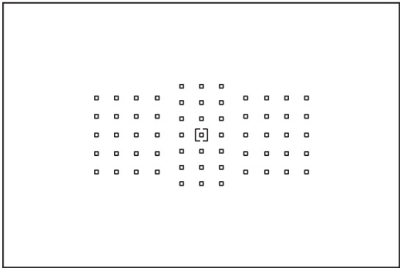
This AF point is slightly larger than the pinpoint above (Single-Point Spot AF as it is called in the Canon manual), and focusing is done on the entire square as shown in the image above. Because this point is similar to the pinpoint, just larger, I would use this in similar scenarios to the pinpoint:
– When a animal is super close, and I want to ensure I have the exact right focus point (like between the eye and nose of Grizzly Bear); or
– When the subject is quite small in the frame and I want to make sure that the focus stays on one small point; or
– If you are shooting a bird in a tree and in between branches, and you want to make sure not to pick up some of these other branches; or
– When using a large aperture and trying to get a shallow DOF, you want to make sure the exact point where you want sharpness is selected, especially if the entire subject isn’t on the same focal plain.
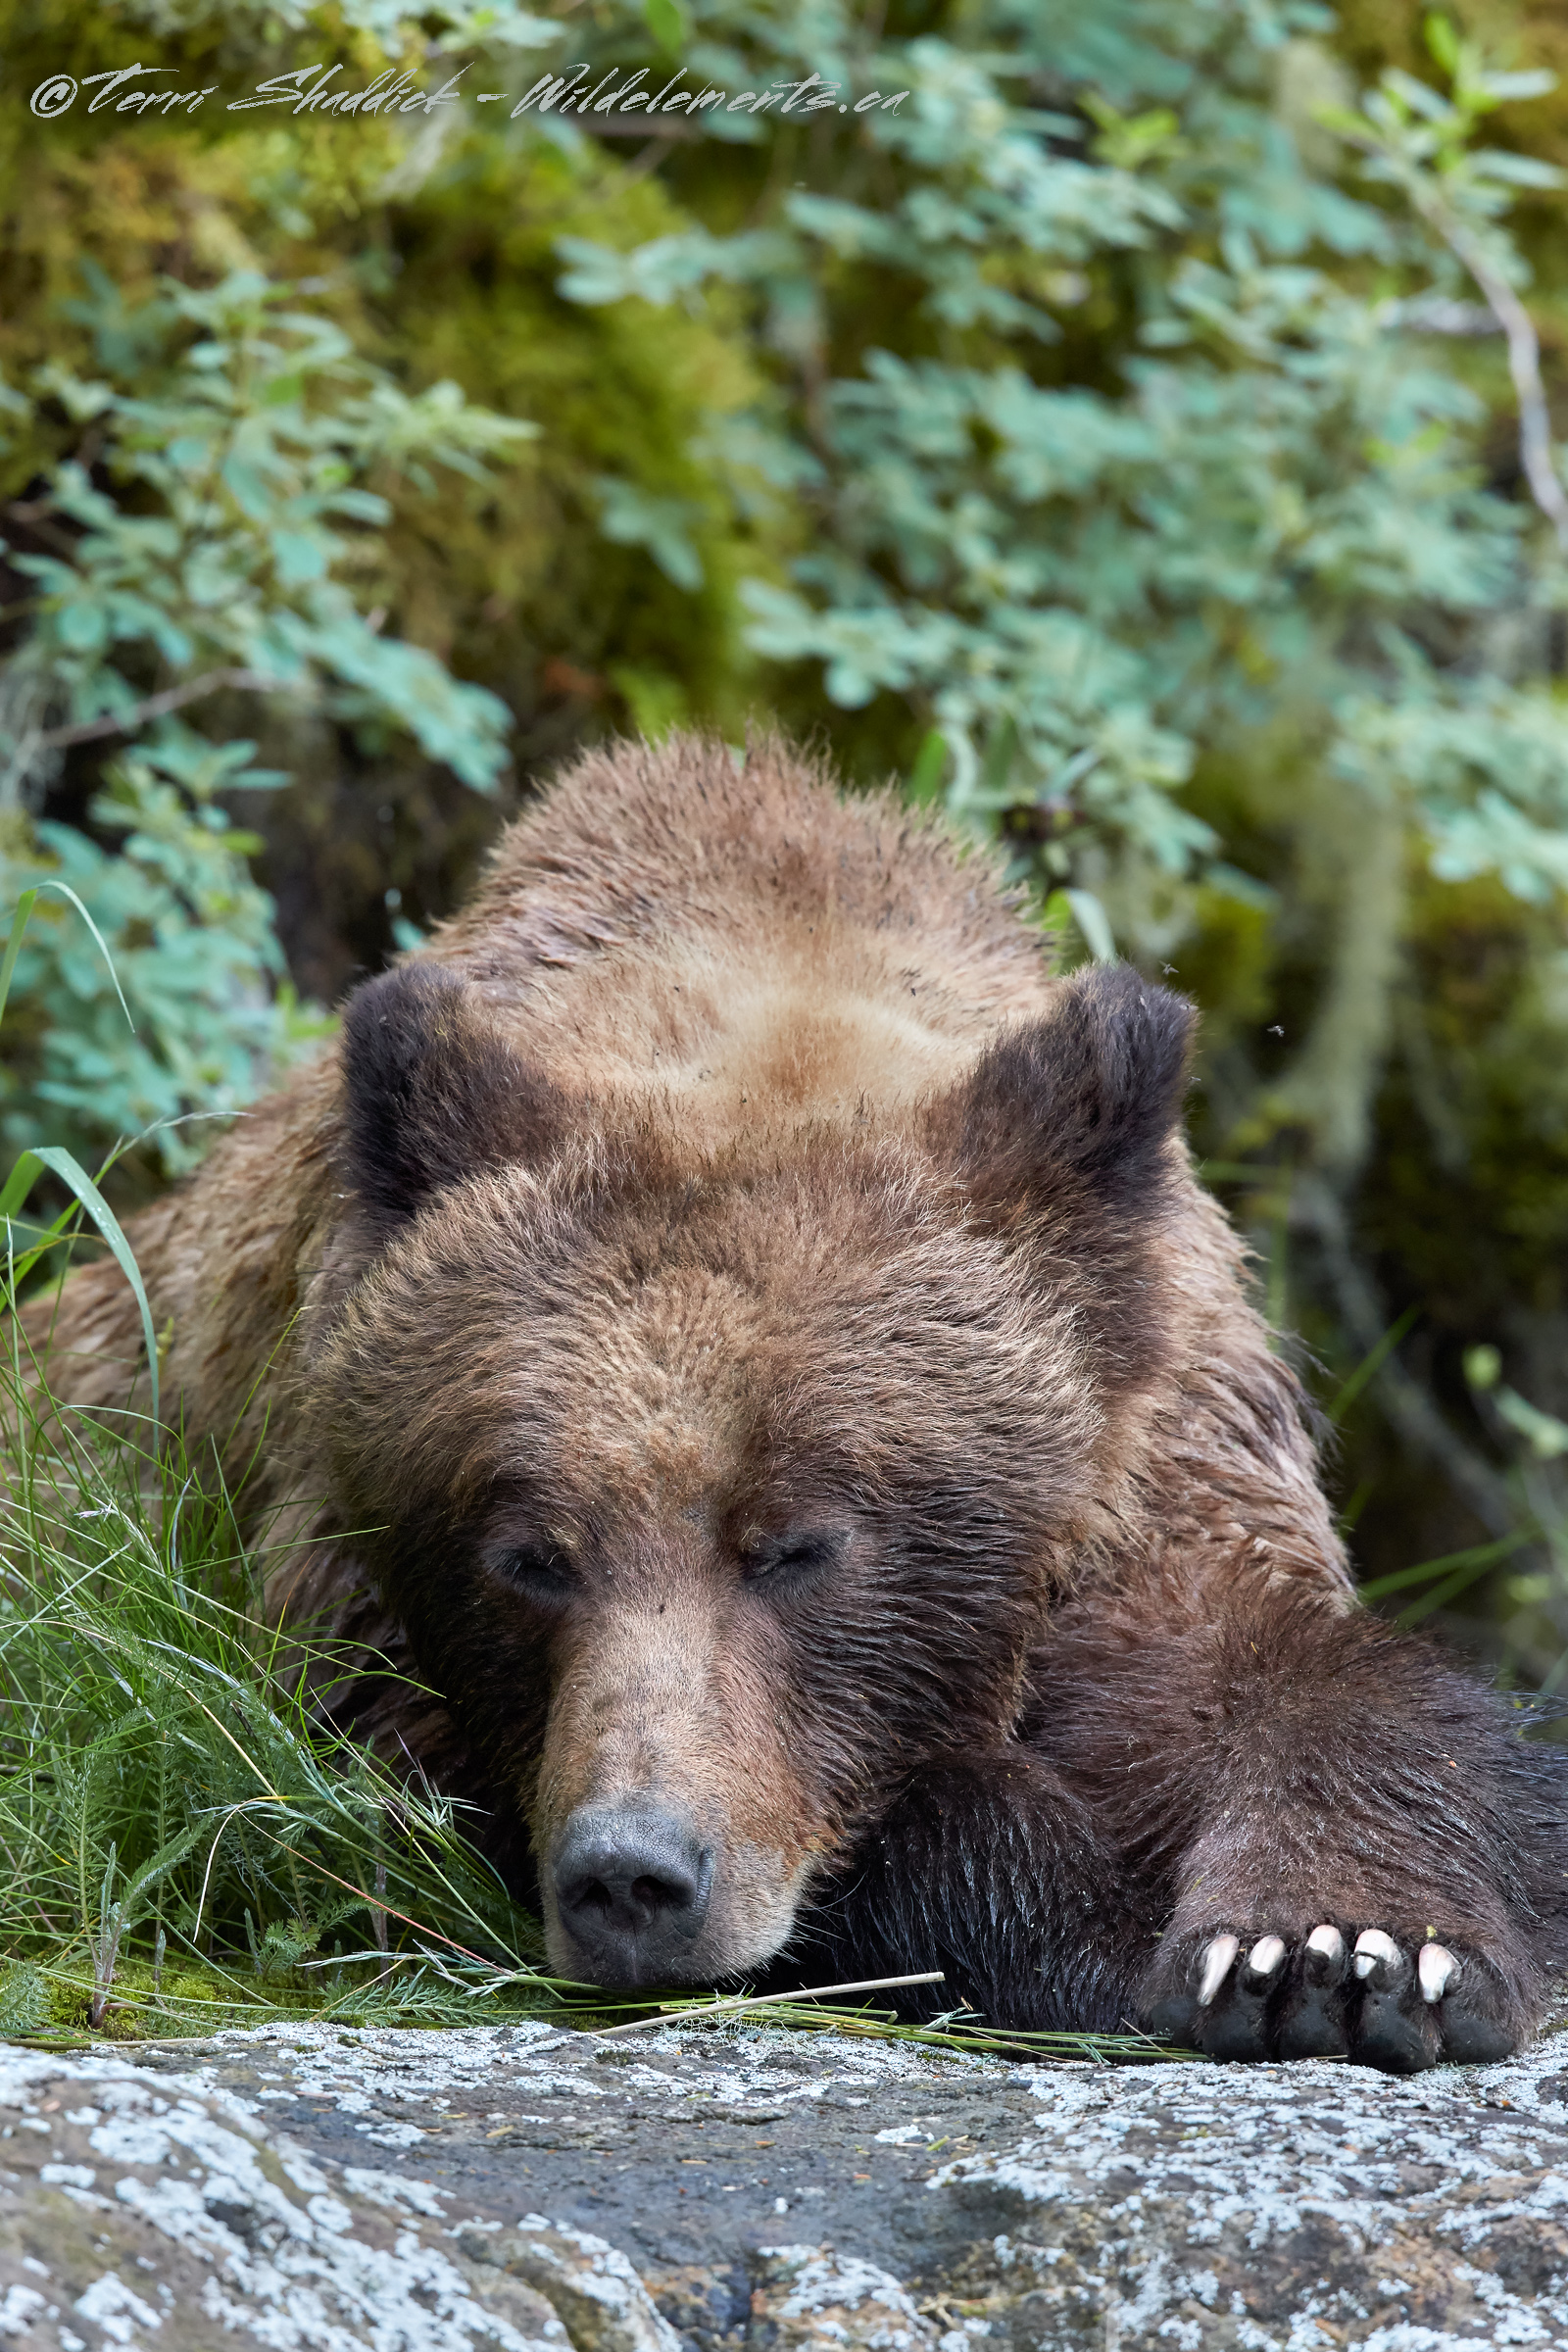
Sleepy Head
Similar to pinpoint, a downside to using single-point is when you are hand-holding the camera, you have a higher risk of losing focus if you slip off the subject. Therefore, again, it is often a point that would be more effective when used with a tripod, and on a subject with either little, or predictable, movement.
For the image of the Grizzly Bear that I titled “Sleepy Head” I used the single-point AF point, because given how zoomed in the shot was it was critical that I got the focus point right so that you can see the dimples in the nose and still have the eye in focus, so therefore I used this point and had it about half-way up the snout of the Grizzly Bear.
With the two points being quite similar just varying slightly in size, the question is what one to choose and when. Well that’s simple, “it depends”. I find that I will often go with the pinpoint when the subject is really small, or when there are a number of things that grab focus (like grass in front of a bear). I will go with the single point when the subject is slightly larger, or if the point being slightly larger won’t really matter.
Feel free to email me, contact@wildelements.ca if you have further questions on the single point options. Stay tuned to the next post where I will cover the expansion points.
In Part 1 of this blog series I listed the different types of AF Points, and how I have grouped them to make it easier on myself. In this blog post I’m going to discuss the two “single point” AF Points, being Single-point Spot AF (pinpoint or spot as I call it) and Single-point AF (single-point).
Single-point Spot AF (I call this “spot” or “pinpoint”)
This is the smallest focusing point available. You would use this point when you want focusing to be very precise, as focusing will be done on the very small little square within the bigger square. I find myself using this point in the following situations:
– When a animal is super close, and I want to ensure I have the exact right focus point (like between the eye and nose of Grizzly Bear); or
– When the subject is quite small in the frame and I want to make sure that the focus stays on one small point; or
– If you are shooting a bird in a tree and in between branches, and you want to make sure not to pick up some of these other branches; or
– When using a large aperture and trying to get a shallow DOF, you want to make sure the exact point where you want sharpness is selected, especially if the entire subject isn’t on the same focal plain.
Balancing on Barbed Wire
One of the main downsides to using spot is that if you are hand-holding, like I often do, it can be quite easy to slip off the point, because the point is so fine and precise. It is often not the best AF point on a subject that is moving, especially moving fast, because you increase the changes of slipping off the subject and blowing the focus of the entire image. Therefore using this point is more effective when using a tripod on a subject that isn’t moving (or not moving quickly).
I used the spot AF to focus on the Tree Swallow in Balancing on Barbed Wire. I actually started with zone AF when shooting this guy, but then when he landed on the barbed wire and looked like it was going to stay still, I switched to the spot. The reason I did this is because the bird is so small I wanted focus to be on the head/eye and not on its shoulder/wing, especially because I was shooting this wide-open at f/5.6 (Canon 500 f/4 + 1.4x extender). Since the eye is drawn to the sharp part of an image, I wanted to make sure that was the eye of the bird. This image was a combination of using a small point because of the size of the subject, and therefore needed precision, and using a large aperture. In this particular image, if I had even switched and using Single-Point, it could have made a difference and picked up the shoulder of the Tree Swallow.
Single-point AF (referred to as “single-point” throughout the rest of this post):

This AF point is slightly larger than the pinpoint above (Single-Point Spot AF as it is called in the Canon manual), and focusing is done on the entire square as shown in the image above. Because this point is similar to the pinpoint, just larger, I would use this in similar scenarios to the pinpoint:
– When a animal is super close, and I want to ensure I have the exact right focus point (like between the eye and nose of Grizzly Bear); or
– When the subject is quite small in the frame and I want to make sure that the focus stays on one small point; or
– If you are shooting a bird in a tree and in between branches, and you want to make sure not to pick up some of these other branches; or
– When using a large aperture and trying to get a shallow DOF, you want to make sure the exact point where you want sharpness is selected, especially if the entire subject isn’t on the same focal plain.
Sleepy Head
Similar to pinpoint, a downside to using single-point is when you are hand-holding the camera, you have a higher risk of losing focus if you slip off the subject. Therefore, again, it is often a point that would be more effective when used with a tripod, and on a subject with either little, or predictable, movement.
For the image of the Grizzly Bear that I titled “Sleepy Head” I used the single-point AF point, because given how zoomed in the shot was it was critical that I got the focus point right so that you can see the dimples in the nose and still have the eye in focus, so therefore I used this point and had it about half-way up the snout of the Grizzly Bear.
With the two points being quite similar just varying slightly in size, the question is what one to choose and when. Well that’s simple, “it depends”. I find that I will often go with the pinpoint when the subject is really small, or when there are a number of things that grab focus (like grass in front of a bear). I will go with the single point when the subject is slightly larger, or if the point being slightly larger won’t really matter.
Feel free to email me, contact@wildelements.ca if you have further questions on the single point options. Stay tuned to the next post where I will cover the expansion points.