18 Mar Canon’s AF System – Part 1


Canon cameras, and all DSLR’s for that matter, have a number of features that are available to help you get the most out of your photographs. And one of those features is the latest Auto Focus settings that come with some of the newest amateur and professional bodies, including the 1DX mark II.
I have stumbled upon Canon’s recently released guide for the Canon EOS 1D X Mark II, which can be found here. Based on my experience the guide can equally be applied to the Canon EOS 5D Mark IV. This guide is probably one of the most extensive guides that I have seen Canon put out on this subject, which speaks the the importance of understanding the autofocus system, however again, it only speaks to one subject, sports, and it can often be difficult to understand how it applies to what we care about, nature.
However, one of the problems I had with guides like this is really understanding the “Cases”, and when certain AF points makes sense for my situation, since all the examples are sports related, and not wildlife related. I have created this series of blog posts, to breakdown the AF system of the Canon cameras, and how it applies to us nature/wildlife photographers, and what I have learned after my time using these settings. I have also decided to provide some guidance on when I use these settings, however, it always “depends” on when I use what, as every situation is unique.
Birds in flight are one of the main subjects when having the correct AF settings can be the difference between making and missing the shot. For the “Mountainside Voyage” I took advantage of Canon’s Zone AF using the 1DX in order to make sure that if the Bald Eagle takes a detour, I can still keep it in focus and keep getting the sharp shots.

Mountainside Voyage
AF Operation:
When thinking about autofocus, one of the first things to determine is which AF Operation is going to be used, with the options being One-Shot, or AI Servo. For wildlife shooting I have learned that it is unpredictable, and you want to always have yourself setup so you can respond when the unpredictable happens (and you don’t miss the shot). Therefore you want to be in AI Servo, as it will continuously focus on your subject when you press the shutter down halfway, and will have predictive focus capabilities and track the subject when it moves toward you.
For further clarification, predictive AF is NOT the same as subject tracking. When the focus is locked on a subject, Predictive AF will work in AI Servo to focus on the subject as it moves toward or away from you, assuming the subject stays in the AF point (a Grizzly Bear walking directly towards you). Whereas subject tracking is how the autofocus system respond when a subject moves away from the focus point (Grizzly Bear walking away from the AF point to an adjacent point).
You can change the AF operation using the Drive AF button and scrolling with the main dial.
AF Points:
Now assuming you are in AI Servo, the next question is, “Which AF point or AF Area do I use?”. Well the answer to that is simple, it “depends”.
I like to group the AF points into the following four categories:
1. Single Points – (AF Points – Part 2 Blog Post to come)
-Single-point Spot AF
-Single-point AF
2. Expansion Points – (AF Points – Part 3 Blog Post to come)
-AF point expansion
-AF point expansion with surrounding points
3. Zones – (AF Points – Part 4 Blog Post to come)
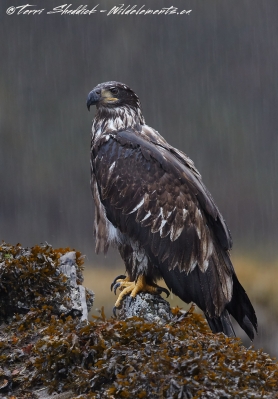
Perched in a Downpour
-Zone AF
-Large zone AF
4. Automatic selection (AF Points – Part 4 Blog Post to come)
Given the length and complexity of each autofocus point, I have decided to split this topic into several different blog posts, so that I can provide example images, and details on when I would use each point.
Also, following the posts on the AF points, I will also dive into the topic of the “Cases” and explain what they really mean, besides “good for a cycling race” so that you can set yours up for the situation you are presented with.
Knowing how and when to use the above points, and also modifying your cases, can be the difference between getting and missing the shot, especially if you modify these settings and setup your cases to reflect different shooting scenarios.
This image “Perched in a Downpour” was shot with “Single-Point AF”, and the reason that this was required was because we were shooting in an absolute downpour. Any of the bigger AF points would be picking up the rain drops, because they were huge, plentiful and closer to us then the Bald Eagle was. The reason I didn’t go with the smaller, Single-point Spot AF was because we were shooting from a Zodiac and there was some movement with the motor and the movement from the water, so I wanted to have a slightly larger point to help stay “locked-on” the Bald Eagle.
Canon cameras, and all DSLR’s for that matter, have a number of features that are available to help you get the most out of your photographs. And one of those features is the latest Auto Focus settings that come with some of the newest amateur and professional bodies, including the 1DX mark II.
I have stumbled upon Canon’s recently released guide for the Canon EOS 1D X Mark II, which can be found here. Based on my experience the guide can equally be applied to the Canon EOS 5D Mark IV. This guide is probably one of the most extensive guides that I have seen Canon put out on this subject, which speaks the the importance of understanding the autofocus system, however again, it only speaks to one subject, sports, and it can often be difficult to understand how it applies to what we care about, nature.
However, one of the problems I had with guides like this is really understanding the “Cases”, and when certain AF points makes sense for my situation, since all the examples are sports related, and not wildlife related. I have created this series of blog posts, to breakdown the AF system of the Canon cameras, and how it applies to us nature/wildlife photographers, and what I have learned after my time using these settings. I have also decided to provide some guidance on when I use these settings, however, it always “depends” on when I use what, as every situation is unique.
Birds in flight are one of the main subjects when having the correct AF settings can be the difference between making and missing the shot. For the “Mountainside Voyage” I took advantage of Canon’s Zone AF using the 1DX in order to make sure that if the Bald Eagle takes a detour, I can still keep it in focus and keep getting the sharp shots.
Mountainside Voyage
AF Operation:
When thinking about autofocus, one of the first things to determine is which AF Operation is going to be used, with the options being One-Shot, or AI Servo. For wildlife shooting I have learned that it is unpredictable, and you want to always have yourself setup so you can respond when the unpredictable happens (and you don’t miss the shot). Therefore you want to be in AI Servo, as it will continuously focus on your subject when you press the shutter down halfway, and will have predictive focus capabilities and track the subject when it moves toward you.
For further clarification, predictive AF is NOT the same as subject tracking. When the focus is locked on a subject, Predictive AF will work in AI Servo to focus on the subject as it moves toward or away from you, assuming the subject stays in the AF point (a Grizzly Bear walking directly towards you). Whereas subject tracking is how the autofocus system respond when a subject moves away from the focus point (Grizzly Bear walking away from the AF point to an adjacent point).
You can change the AF operation using the Drive AF button and scrolling with the main dial.
AF Points:
Now assuming you are in AI Servo, the next question is, “Which AF point or AF Area do I use?”. Well the answer to that is simple, it “depends”.
I like to group the AF points into the following four categories:
1. Single Points – (AF Points – Part 2 Blog Post to come)
-Single-point Spot AF
-Single-point AF
2. Expansion Points – (AF Points – Part 3 Blog Post to come)
-AF point expansion
-AF point expansion with surrounding points
3. Zones – (AF Points – Part 4 Blog Post to come)
Perched in a Downpour
-Zone AF
-Large zone AF
4. Automatic selection (AF Points – Part 4 Blog Post to come)
Given the length and complexity of each autofocus point, I have decided to split this topic into several different blog posts, so that I can provide example images, and details on when I would use each point.
Also, following the posts on the AF points, I will also dive into the topic of the “Cases” and explain what they really mean, besides “good for a cycling race” so that you can set yours up for the situation you are presented with.
Knowing how and when to use the above points, and also modifying your cases, can be the difference between getting and missing the shot, especially if you modify these settings and setup your cases to reflect different shooting scenarios.
This image “Perched in a Downpour” was shot with “Single-Point AF”, and the reason that this was required was because we were shooting in an absolute downpour. Any of the bigger AF points would be picking up the rain drops, because they were huge, plentiful and closer to us then the Bald Eagle was. The reason I didn’t go with the smaller, Single-point Spot AF was because we were shooting from a Zodiac and there was some movement with the motor and the movement from the water, so I wanted to have a slightly larger point to help stay “locked-on” the Bald Eagle.